How to Create a New MySQL Database for WordPress? Create a new database is not as difficult as you think. If you know the step of how to create it, it is just straightforward.
Why you need to create MySQL database Manually?
Here I list for you why you need to create MySQL database manually via your cPanel.
- If you want to create or install any script manually on your server such as WordPress.
- If you want to transfer your web from an old server to new hosting.
So, this tutorial quite important for you if you want to manage your website by your own.
Let’s get started.
Create a New Database for WordPress
Step 1: First, please log in to your cPanel. If you do not know how to do it please refer to our guide on how to log in cPanel.
Step 2: Go to Database section and click on MySQL®Databases.

Step 3: Put any database name here. Make sure the database name is related to your web domain for your reference. After that, click on the Create Database button.

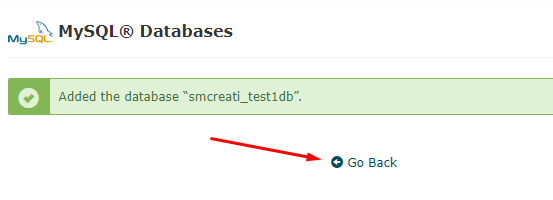
You will go directly to this page after click the button. Just click Go Back link to go to the previous page.
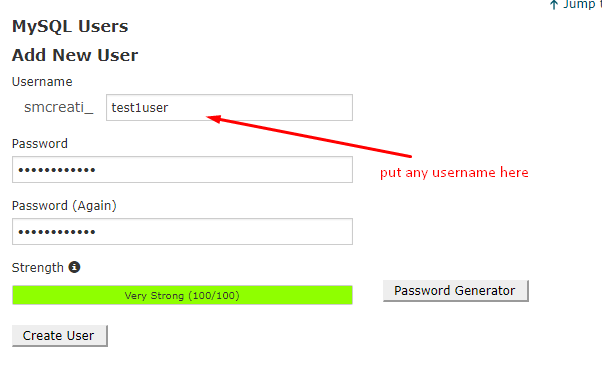
Step 4: Now you have a database name. Next, you should create Username for the database. In the same page, scroll down until you see like as the screenshot below. Put your username and secure password. Then click on Create User button.
After that, you will see the successful message like this. Just click on Go Back link to go to the previous page.

Step 5: The next step is, you must add the user to the database. Scroll down and you will see this. Please select User and Database which is you have created just now.

Step 6: After you click the Add button, you will direct to compile all privileges page. See more in the screenshot below.
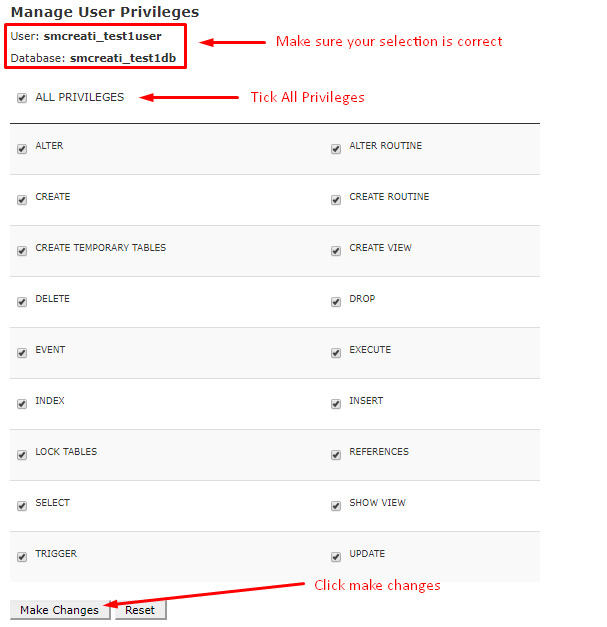
Click tick on All Privileges to select all and then click Make Changes button to compile process between your user and database.
Your new database now successfully created. It ready for you to use it.
Info: For your information, your new database is a nulled database. The next step is you need to upload database content here.
Upload Old Database to New Database (Bonus)
Usually, when you have done created a new database, you can upload the old database to new database. So, how you can do it?
Follow the tutorial below.
Step 1: Log into your cPanel.
Step 2: On the Database section, click on phpMyAdmin

Then you will be brought directly to page like shown below.
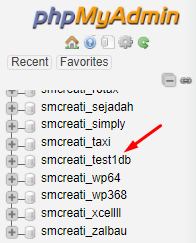
Step 3: Now, you are in the phpMyAdmin area. Here you need to choose your database properly which is you have created just now. Click on it.
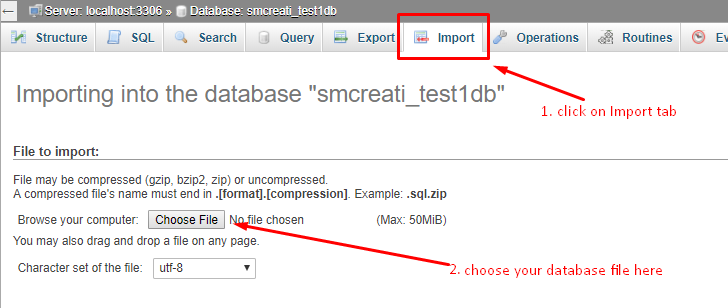
Step 4: Click on the Import tab and choose your database file. Nothing you can do after that. Just wait for a success message or failure message. If you receive a success message, you no need to do anything because it already finishes. If you receive a failure message, please contact your host provider.
Conclusion
In this tutorial, you have learned how to create a new database to transfer a WordPress site to a new host and for the bonus tutorial, I have shown you how to upload an old database to a new database.
If you any problem with this tutorial, just drop a comment below. I will appreciate it!


0 Comments