How to Install Plugin On WordPress? After installing WordPress, you need to learn how to install the WordPress plugin properly. The plugin allows you to add new features to make your blog more function as you need. But, not all plugins you need to install. You must choose which one the best as per your need. There are a thousand free and paid plugins you can do that.
In this tutorial, I want to show you how to install plugins in four ways. Many ways will help you to solve your problem if one of them not working for you.

Table of Content
- Install Plugin By Using WordPress Plugin Search
- Install Plugin By Upload Direct From Dashboard
- Install Plugin By Upload On cPanel
- Install Plugin By Using FTP
How to Install Plugin On WordPress – Step by Step Guide
So here it is.
Method 1: Install Plugin By Using WordPress Plugin Search
This is a common and simple method using almost by WordPress user. But this method can use only if the plugin listed on the WordPress plugin repository.
Step 1: Login to your WordPress admin panel. Ex: www.yourweb.com/wp-admin
Step 2: Go to menu Plugin » Add New
Step 3: Type keyword of plugin you need

Step 4: Click on button “Install Now”
Step 5: Finally click activate plugin link to activate it.
Method 2: Install Plugin By Upload Direct From Dashboard
Usually you can use this method if you buy the premium plugin from another website. So, you can upload your plugin from your desktop or local files.
Step 1: Login to your WordPress admin panel. Ex: www.yourweb.com/wp-admin
Step 2: Go to menu Plugin » Add New
Step 3: Upload your plugin from your local computer

Step 4: Finally click activate plugin link to activate it.
Method 3: Install Plugin By Upload On cPanel
This method is very rarely used to install plugins. But in certain cases such as you cannot directly install into the WordPress dashboard due to a WordPress memory limit error. So, you can use this method.
Caused this method use cPanel, you may refer our guide on how to use cPanel.
Step 1: Login to your cPanel. Ex: www.yourweb.com/cpanel
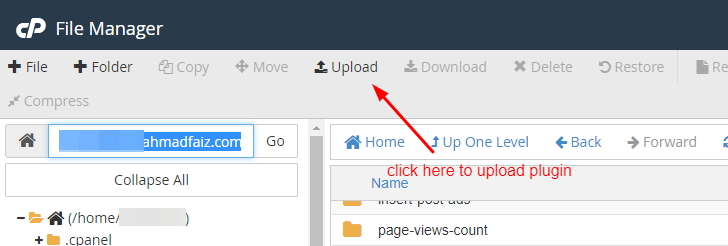
Step 2: Click File Manager » Root domain of WordPress installation and you need to access the path /wp-content/plugins/.
Example: public_html/yourdomain.com/wp-content/plugins
Step 3: Then, click on upload to upload plugin here. Make sure before you upload the plugin, please unzip folder first.

You cannot upload directly zip file into server via cPanel.

Step 4: Activate your plugin manually on the plugin page. Go to menu Plugin » Installed Plugin.

Search the plugin that you have uploaded just now and activate it.
Method 4: Install Plugin By Using FTP
The best free FTP Clients are WinSCP and Filezilla. But for me, WinSCP is the best FTP because it is more user-friendly. If you want to learn how to use FTP in detail, please refer to our guide on how to use FTP Client.
Step 1: Open the FTP client on your computer and connect to your website using the login credentials.
- Hostname: vm929.fcomet.com
- Username: cPanel Username
- Password: cPanel Password
- Port: 21
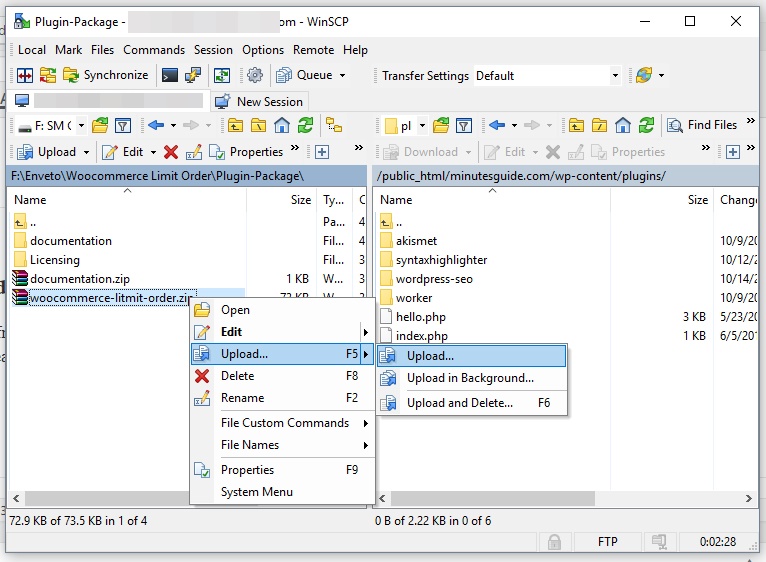
Step 2: Once connected, you need to access the path /wp-content/plugins/. Example: public_html/yourdomain.com/wp-content/plugins
Step 3: I assume you use WinSCP. Click on the right click, and you will see Upload link to upload it. You can upload in format .zip or unzip file. If you upload in format .zip file, please extract it after that.

Step 4: Activate your plugin manually on the plugin page. Go to menu Plugin » Installed Plugin. Find your plugin and activate it.

Conclusion
On this article, you have learned how to install a plugin on WordPress correctly. Choose the best method which one you more easy to use it.


0 Comments